In a previous post, I discussed a plugin for Volumio to add Spotify connect ability to this headless audio-player OS. I also pointed out that the competing OS, Max2play did not seem interested in incorporating this feature in their OS. A missed chance in my view, as there was a clear appetite for it if you checked the feature requests on their forum.
But they clearly took up the gauntlet, and after perfecting their plugin infrastructure and suggesting to the user community they could create a Spotify connect plugin, they came with such a plugin themselves. It is still a beta version, with still some stability issues but if it is running, it works as it should. This plugin has some prerequisites: It will only work if you’re a Max2play premium user (€9,99/year) and a Spotify premium user. In this sense, Volumio with the Balbuze plugin is still the cheapest solution.
Installation is quite straightforward, but also a bit more hassle than Volumio, especially when you are also using also other audio-players such as Squeezelite on Max2play. You can find my video tutorial and demonstration of the functionality below. As already said there are some stability issues. After some time the device Max2play with the Spotify connect plugin installed and running disappears from the list of available devices in the Spotify App. Stopping and restarting the instance of the plug-in will deal with this, but this should not be needed.
In previous posts I already talked about all these different headless audioplayer operating systems there are for small single board computers such as the Raspberry Pies (eg. Volumio and Max2Play). I also discussed that I am a Spotify user and love the Spotify Connect feature and the multiroom speaker possibility it brings. But the two audioplayer OSes that I am current testing did not support Spotify Connect so far, so I am currently resorting to a multiroom setup using Max2Play, Logitech Media Server (LMS) and the “triode” Spotify plugin to control several devices (RPis with Squeezeplayer software/Squeezebox duet receiver) for audio playback. It works, but the look and feel of LMS is very dated, so I am still on the lookout for improvement and I am not alone. The requested features section of the user forums of both Volumio and Max2Play show major interest in Spotify Connect. However the developer(s) of Max2Play does not seem to warm-up to this feature, while it trumps to be the multiroom audio centered OS. A missed chance in my view. In the meanwhile, Volumio has beaten Max2Play to the punch via support of third party plugins and the coding work available at Github of user “Balbuze” which seem to be based on previous work of “Fornoth” and “Plietar”. I am planning to test Balbuze’s Spotify Connect plugin “Volspotconnect” in Volumio shortly on my Pi Zero that currently runs Max2play. The plugin is specific for ARM6 and ARM7 chip based computers such the Rasberry Pi’s, so if you are running Volumio on a Intel machine, bad luck for now. It is a basic plugin that just makes your Volumio device show up as a Spotify Connect device. It has no connection with the Volumio interface yet, so no control via this interface or cover-art. This is no problem as you would rather use the Spotify software or app to control playback. It is clearly a work in progress. I also thought that you also needed a Spotify app developers key, which your can request here. However commenter Wim, indicated that this key is already present in the zip file provided by Balubuze. That makes it even simpler, I hope to have time soon to get this up and running. This also seems a good topic for a Youtube tutorial so stay tuned!
In an previous post, I discussed that I have been using the Logitech Squeezebox Duet and Logitech media server (LMS) software, to be able to play my mp3 collection and stream audio from Spotify. But the iPod shaped Duet controller, over 7 years old, got some issues charging its battery. I am hoping to be able to fix it, but in the meanwhile I wanted a bit of a replacement, to control audio playback, without using for example, the “Squeezer” app on my android phone.
The Logitech Squeezbox Duet controller.
Before I bought the Squeezebox duet somewhere in 2009, I had been experimenting with a touchscreen based solution in combination Asus eeebox mini PC, but wasn’t really satisfied. Then came the Squeezebox duet along and I replaced the touchscreen setup for it. However, I kept the LG Flatron L1510SF 15-inch touchscreen. Now in 2016 one of the best community supported mini PCs must be the Raspberry Pi. I have also been playing with it to make both video and audio-player devices. There is also already a whole range of supported small touchscreens, which connect via the GPIO header or Display header, but using screens with HDMI, DVI, or VGA input and USB for the touch-control seems not so common. But when my Squeezebox Duet controller got issues charging, I was thinking why not pair my old 15-inch touchscreen with a Raspberry Pi running LMS?
Setting up Logitech Media Server (LMS)
Setting up a Raspberry Pi with LMS is very simple when you use the Max2Play audioplayer OS. Just download the SD image from the Max2play website, write it to the SD card with a tool like win32diskimager. Insert the SD in the Rpi, connect the Rpi to you network using an ethernet cable and power it up. You now can enter the setup of Max2play on you Rpi, by typing the URL: max2play/ in your browser. In the setup interface you can select to install LMS and the Squeezerplayer playback software onto you Raspberry Pi automatically. In this way you have a headless audio server device, which can playback songs locally or on other squeezebox devices on your network. You can control it via an app like Squeezer on android or by logging into the LMS server web-interface on your laptop or PC.
Jivelite, the touchscreen interface for LMS
The LG Flatron L1510SF USB controlled touchscreen.
In my case, I wanted to use a local touchscreen display to control Rpi with LMS. For this, you have to do some extra work. First of all, you need to connect the screen and also for setup purposes, a keyboard and mouse. Secondly you need to install the JiveLite Squeezebox interface software via the Max2play setup. This is a Max2Play premium feature which costs you a license fee of €9,99 per year. It is possible to setup LMS and Jivelite without Max2Play, but not as effortless as provided by the setup interface of Max2play. The JiveLite setup in Max2Play lets you also select several JiveLite interface skins, but these are tailored to the smaller Raspberry Pi specific touchscreens and needed some modification to get a fitting layout for the 1024×768 resolution of my LG touchscreen. But more about that later.
Calibrating your USB touchscreen
Now we first need to get the USB touchscreen working with the Raspberry pi. When researching how to do this, I came across this article (in Dutch). Which describes the process for the exact same screen as I am using. First of all, you need to install xinput-calibrator. You best do this locally on your Rpi using the attached mouse and keyboard by opening a terminal window and typing sudo apt-get install -y xinput-calibrator. You now have to run xinput-calibrator by typing xinput-calibrator. This will open a window for calibration. You can follow the instructions for calibration and use a stylus for best precision. This will result in an output window with calibration parameters that need to be put into the /etc/X11/xorg.conf.d/99-calibration.conf file. I did this with the parameters I recorded but run into problems. The LXDE gui would not show after a reboot. So in the end, I just used the exact same settings as described in the article with the exact same LG touch screen. That did the trick, the touchscreen is working fine.
Making the Joggler skin fit your resolution
Now I wanted the have a JiveLite skin that was a good fit with the resolution of the screen. The Joggler skin, came nearest to what I wanted but needed adjustment to fill the whole screen. For this you need to edit the code of skin file: /opt/jivelite/jivelite/share/jive/applets/JogglerSkin/JogglerSkinApplet.lua
And edit line 259 so it reads: Framework:setVideoMode(1024, 768, 0, false) where 1024 and 768 reflect the resolution and aspect-ratio of the screen.
When you want the spectrum visualizer of Jivelite to show correctly (Only visible when playing audio locally on the LMS machine). You also need to edit the following section in the JogglerSkinApplet.lua file. The values to edit are shown in bold
spectrum = {

position = LAYOUT_NONE,

x = 0,

y = 2 * TITLE_HEIGHT + 4,

w = 1024,

h = 566 - (2 * TITLE_HEIGHT + 4 + 45),

border = { 0, 0, 0, 0 },

padding = { 0, 0, 0, 0 },
After a restart of the Jivelite GUI, or reboot of the system, the layout should have a good fit with the resolution of the screen. Some buttons may still not have the most perfect scaling, but it is all functional. I however will, keep an eye open for a more perfected 1024×768 skin for JiveLite. If you a reading this and have one or knows one, please let me know.
Finally
One small thing is still bothering me and this is the visible mouse cursor. Max2Plays add-on, specific for the smaller Raspberry Pi touchscreens, has a very handy checkbox to make the mouse pointer on a touchscreen invisible. But as my touchscreen is not supported by this add-on, I cannot use it. Any suggestions to make the mouse pointer disappear are also very welcome. To get a better impression of how it works and what it looks like I recommend you to watch my youtube video about it, here below.
In my previous post, I discussed the problem with the Medion P69055 WiFi multiroom speaker and Spotify connect. It could and should support Spotify connect, but most probably lacks a firmware update to enable this feature. A big let down by Medion, but how to solve this? In the end, I opted just to use the line-in of the speaker and connect some “low-cost” device that supports Spotify. In this post, I will discuss three different devices to achieve this.
1. A netbook/laptop with Volumio and the Spotify plugin.
I already showed in my first post and youtube video, how to turn any old intel based laptop or netbook into a headless audio player that can be controlled by a webinterface on your smartphone or other PC, while closed and hidden from sight. In this case you just plug in this device into the line in of the speaker and voila. Pro: If you have an old laptop or netbook available and an SD card then you get it working without extra costs. Con: Even a small netbook is still a bulky device which is not easy to hide.
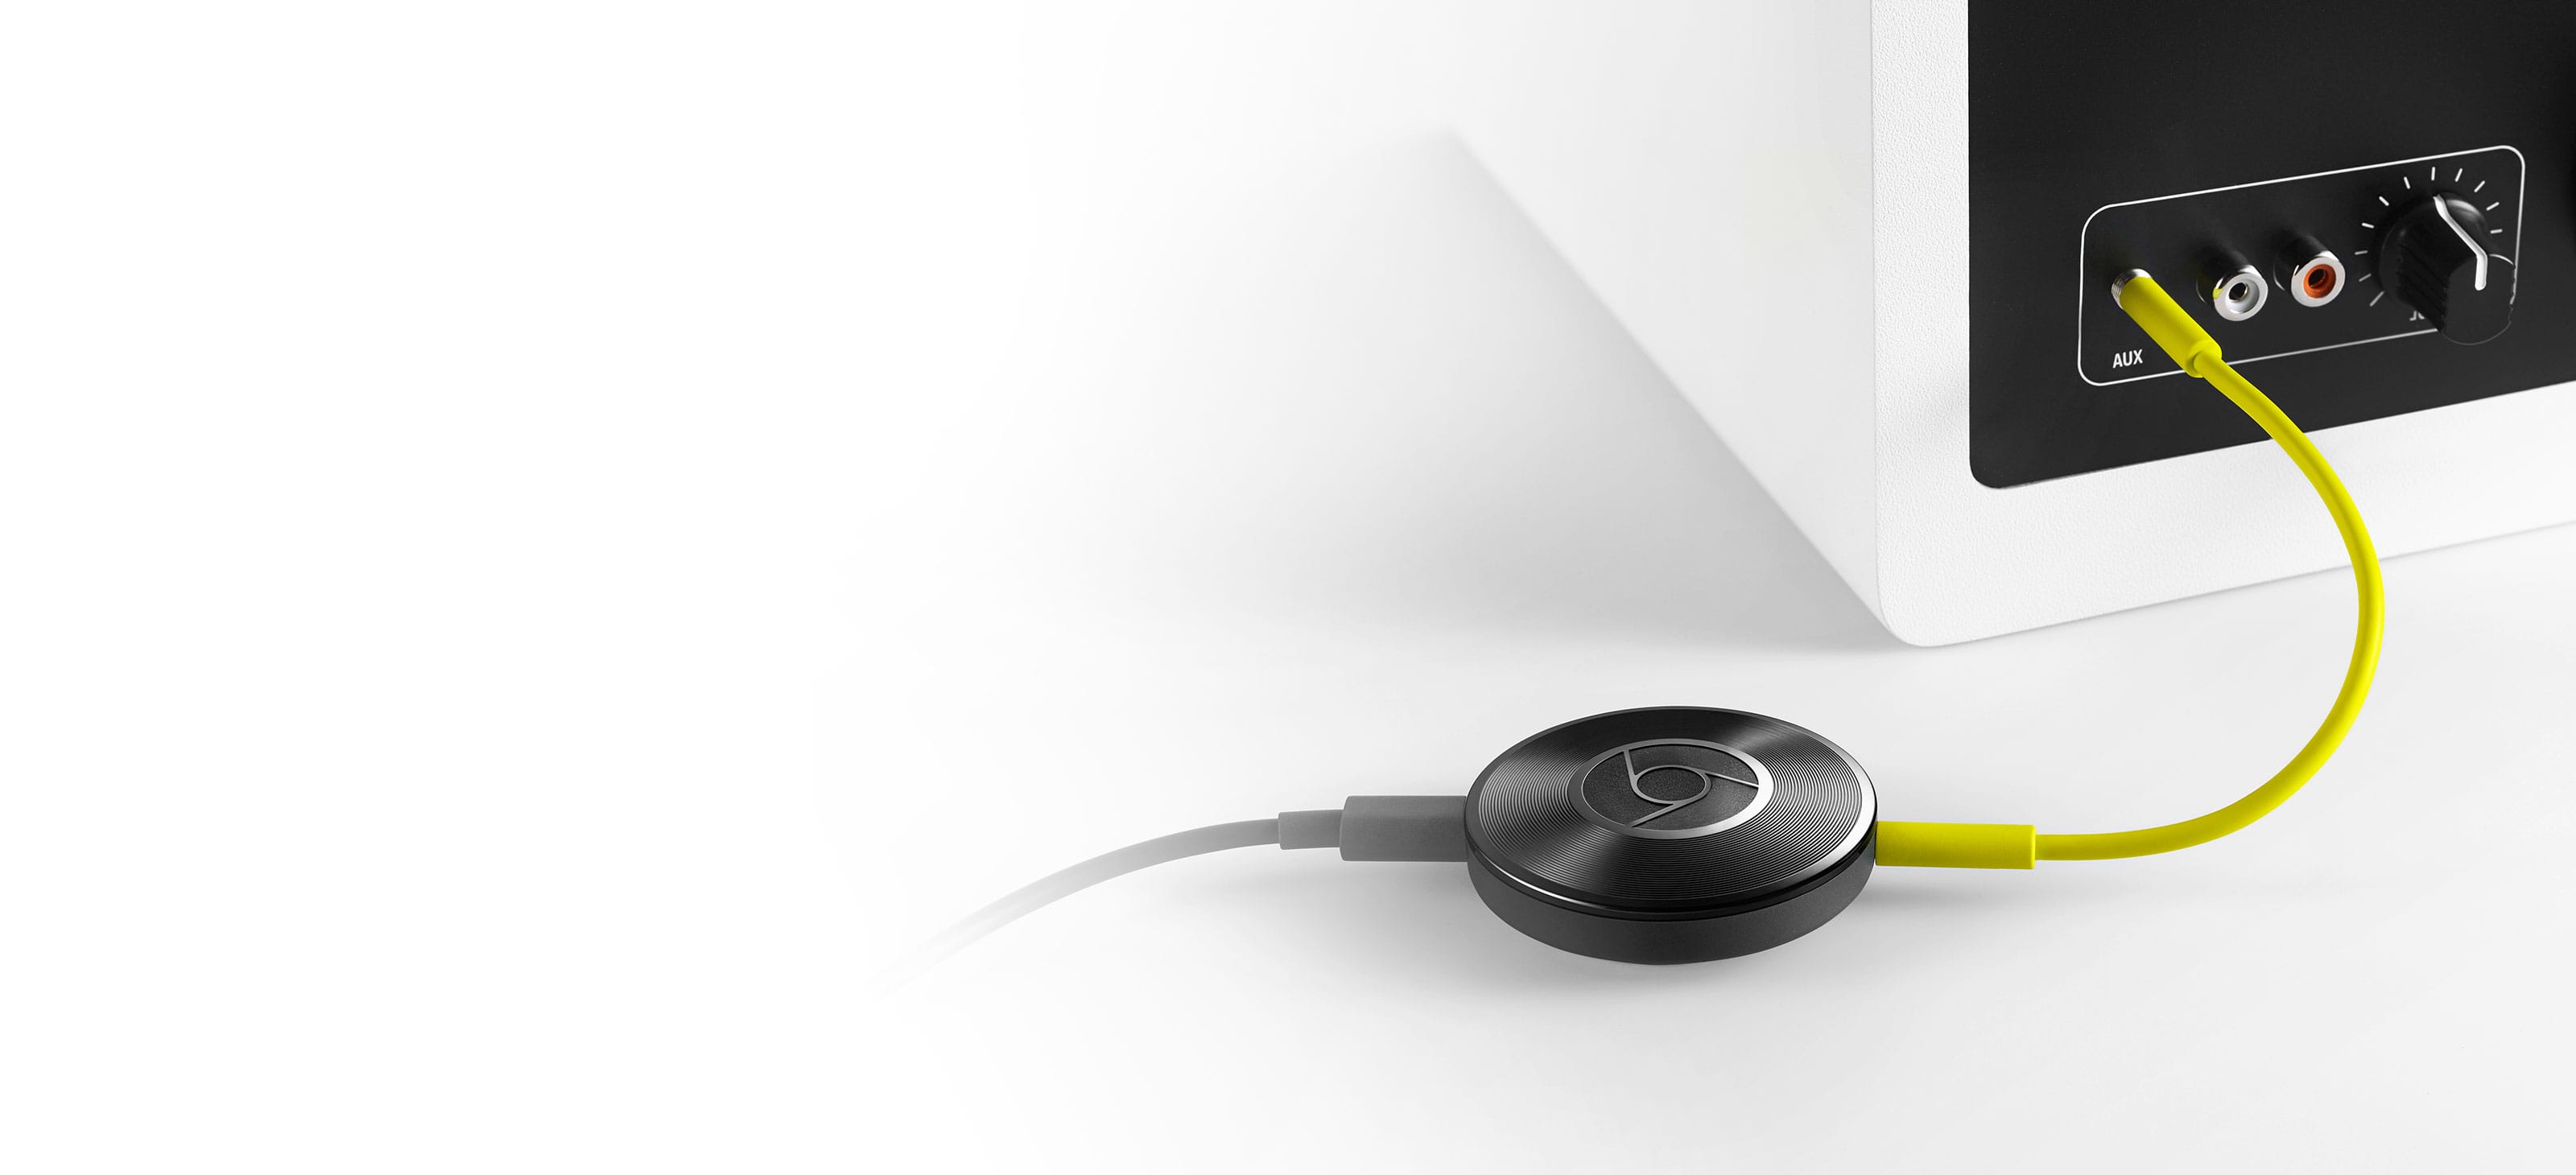
2. Chromecast Audio
With a price-tag of below €40, the Chromecast audio is a cheap and simple device to get Spotify on any speaker or audio system. It is also conveniently small. It gets powered via an micro usb port and with an extra accessory, you can also use an SPIF digital audio cable to connect the cast to your audio system. Setup is simple and straightforward to let it connect to your WiFi router. You can also set it up to allow your friends to connect to it with their android smartphone, so you can have an evening of music sharing.
The Chromcast audio is android phone centered and is not visible for other devices with the Spotify software until you activate it using the Spotify app on your android smartphone. If you use the Chrome browser you can circumvent this by using the Chromecast extension in combination with the Spotify web player. Pro’s: Cheap, small, easy to setup. Con: Really android phone centered.
Chromecast audio
3. DIY project: A Raspberry Pi zero with a DAC.
This last solution is a completely other beast. It’s not the cheapest solution and requires SOLDERING. So let’s list what you need:
A Raspberry Pi zero. This is the most minimalistic, smallest and cheapest of the Raspberry Pies. Because of its popularity, it is also hard to get and the three webshops where you can get them only allow you to order one per customer. There is also this neat little website to see which web shops have them in stock: whereismypizero.com. A single Pi zero costs about €5, but most shops offer them in project kits between €15 and €35.
The Pimoroni pHAT DAC. This is a Pi zero sized digital analog converter board, which uses the same chipset as the much more expensive HiFi-berry full-size boards. A single pHAT DAC board is available for prices between €14 and €20.
GPIO headers. The Pi zero and pHAT DAC only have holes and no GPIO headers, so you have to solder these on yourself. This allows for more freedom to connect the pHAT DAC to Pi zero in different configurations depending on the size of your case. I just soldered a strip of male GPIO pins on the zero and a female header on the pHAT DAC board. You only need 5 pins to make the connection between the Pi zero and pHAT DAC working. I however, used the full 20 pins to make the connection also mechanically stronger.
A Rasberry Pi compatible Wifi dongle, with a micro USB connector or a normal one and a micro to full-size USB adapter. This should set you back for between €5 and €10 euro depending on the shop. Yes, the Pi zero has no onboard Wifi like the Raspberry Pi 3, which is a pity.
A class 10 micro-SD card of 8 Gb or more, to install an OS and audio player software.
A nice case to put it all in. I opted for this small polycarbonate case I found on amazon. It needs some adaptation to allow access to the 3.5 mm jack of the pHAT DAC and it is a snug fit with the pHAT DAC on top of the Pi-zero, but it is nice full enclosure with access to all ports and the micro SD card slot.
A USB 5V 2 A power adapter to power the Pi zero.
Optional: a USB hub with Ethernet connector, for the initial setup op the audio software on the Pi zero before switching to Wifi. The software used, also allows initial setup using WPS, but I found that to be a bit of plug and pray feature. With a network connection via a cable, your sure it will work.
The Pimoroni Wireless Audio Kit.
In the end, I opted for the Pimoroni pHAT DAC Wireless audio kit which consists of a Raspberry Pi zero, the Pimoroni pHAT DAC, the needed GPIO headers, a WiFi dongle with adapter and A 3.5 mm Jack cable male to male. It also includes some parts I did not use like the micro HDMI to HDMI adapter, the RCA out adapter that can be soldered onto pHAT DAC board and USB to micro USB adapter. But with a price tag at the time of around €30 euro it is still a good deal for the parts I needed. I also bought the USB 5V 2A powersupply for around €6 euro and the USB hub for just below €10. The small polycarbonate case set me back €6. So round and about 52 euro without the SD card, so let’s say €60 with.
The Pi-zero/pHAT DAC in the case. The slit to fit the top of the case over the pHAT DAC board is not very pleasing to the eye but functional.
So on to the assembly of this device, which starts with soldering the GPIO headers on to the Pi-zero and pHAT DAC board. For any instructions on that just look on YouTube, like this video, this or this one. I myself used some blue-tac type putty to stabilize the PCBs on my table to do the soldering. With the GPIO pins and female header attached you can now connect the pHAT DAC board to the Pi-zero. I then modified the top lid of the polycarbonate case with a cutter knife and sanding stick to make a slit for jack line-out socket of the pHAT DAC. It came out to be, let’s say more functional than esthetical. But to my pity, I do not have a Dremel rotary tool to my disposal. It has to be a slit, as the top lid has to slide over the pHAT DAC board with no space to spare and this socket sticks out. With this modification done, the case can be closed. With this, most of the assembly work is already done. You can also find more detailed instruction on how to assemble a Pi zero with pHAT DAC combo elsewhere on the internet, like for example this one.
The next step is to prepare your SD card with an appropriate audio player dedicated OS. As described earlier, there is choice, such as Volumio, Mood audio and Rune audio. For this project my choice was Max2play, which is really multiroom centered and supports Logitech Media Server (LMS) software using Squeezeplayer. I was already acquainted with this system, having a Logitech Squeezebox Duet in use and LMS, with the needed Spotify plugins, running on a local Linux machine. LMS has also the nice feature that you can synchronize playback of your speakers via wifi. Which is ideal for parties when you want the same background music everywhere around the house.
Setup is straightforward: Download the Max2play disc-image (in this case the image with Hifi-berry support) and write it to the SD card. I then inserted the SD card in the assembled Pi-zero, attached the USB hub to the USB peripheral port of the Pi-zero with the Wifi dongle and an ethernet cable inserted, the last of which in turn was connected to my router. I then powered up the Pi-zero using the 5V 2A USB PSU. On another computer I entered the URL: max2play/ and voila the Max2play setup interface was loaded. In this interface I set my Wifi SSID and password, activated Squeezeplayer and indicated that I wanted to use a Hifi-Berry (PI A/B) as audio output to activate the line-out on the pHAT DAC. This initial setup is also explained in this Max2play tutorial video. Then I initiated a shutdown, removed the USB hub and connect the Wifi Dongle directly to the Pi-zero. I could now connect the Pi-zero to the Medion P69055 speaker, select in-line, power up the Pi-zero and voila: A wifi enabled speaker with Spotify that I can control using my smartphone and more importantly with the Logitech Squeezebox duet controller I already used for my HiFi system in the living room. But after a couple of months, my trusted duet controller got battery charging issues, but that’s for another time.
The pro’s: More flexible and fun solution and great sound of a good quality DAC. The con’s: More expensive than the Chromecast, and you have to assemble it yourself. But for me that is half the fun!
Conclusion
So these are some solutions to the issue of no Spotify on the Medion P69055, but of course also applicable to any audio system with a line-in. The “low cost” aspect is rather relative of course, only the old disused laptop with Volumio is really low cost. The Chromecast audio and Pi-zero are 40 and 60 euro respectively and that to fix a speaker which cost me just about €100, bummer! But okay, now it works to my satisfaction so I am fine in the end. You may say that technically non of the solutions are genuinely Spotify-connect solutions. Yes that’s true, but all solutions allow you to play music using your Spotify premium account, they are just not using the Spotify Connect protocol. The Spotify Connect protocol is currently dissected by several enthusiasts, so I expect that this feature will become available for the Raspberry Pi zero in any shape or form. I will be keeping an eye on that. I like the Raspberry Pi zero pHAT DAC combination best as it is the more flexible solution in terms tweakablity. Do you want Apple Airplay or use Google Music instead of Spotify? The Rasberry Pi with Max2play has that flexibility. One thing to keep in mind is to use a good PSU for the Raspberry Pi zero pHAT DAC. Digital/Analog converters are very sensitive to power fluctuation and using a botched PSU may introduce interference. The Medion P65099 has for example a USB charging port, but powering the Pi zero pHAT DAC combination, but also the Chromecast via this port, resulted in background static. Real audiophiles use PSUs with linear power outs, to have the best sound quality, but I this case this is a bit overkill.
There are also other Chromecast audio like devices that are genuine Spotify Connect devices such as the Fon Gramofon and Rocki. Both start at a €65 price tag and especially the Rocki, a former Kickstarter project got bad reviews with difficult setup, bad customer support and melting batteries. The Gramofon I still find quite intriguing as it also uses the same Quallcomm Allplay technology that should allow the Medion P65099 speaker to use Spotify Connect. However with reviews questioning the sound quality of the Gramofon and the price tag of €65 make me hesitant.
 In previous posts I already talked about all these different headless audioplayer operating systems there are for small single board computers such as the Raspberry Pies (eg. Volumio and Max2Play). I also discussed that I am a Spotify user and love the Spotify Connect feature and the multiroom speaker possibility it brings. But the two audioplayer OSes that I am current testing did not support Spotify Connect so far, so I am currently resorting to a multiroom setup using Max2Play, Logitech Media Server (LMS) and the “triode” Spotify plugin to control several devices (RPis with Squeezeplayer software/Squeezebox duet receiver) for audio playback. It works, but the look and feel of LMS is very dated, so I am still on the lookout for improvement and I am not alone. The requested features section of the user forums of both