In a previous post, I discussed a plugin for Volumio to add Spotify connect ability to this headless audio-player OS. I also pointed out that the competing OS, Max2play did not seem interested in incorporating this feature in their OS. A missed chance in my view, as there was a clear appetite for it if you checked the feature requests on their forum.
But they clearly took up the gauntlet, and after perfecting their plugin infrastructure and suggesting to the user community they could create a Spotify connect plugin, they came with such a plugin themselves. It is still a beta version, with still some stability issues but if it is running, it works as it should. This plugin has some prerequisites: It will only work if you’re a Max2play premium user (€9,99/year) and a Spotify premium user. In this sense, Volumio with the Balbuze plugin is still the cheapest solution.
Installation is quite straightforward, but also a bit more hassle than Volumio, especially when you are also using also other audio-players such as Squeezelite on Max2play. You can find my video tutorial and demonstration of the functionality below. As already said there are some stability issues. After some time the device Max2play with the Spotify connect plugin installed and running disappears from the list of available devices in the Spotify App. Stopping and restarting the instance of the plug-in will deal with this, but this should not be needed.
In an previous post, I discussed that I have been using the Logitech Squeezebox Duet and Logitech media server (LMS) software, to be able to play my mp3 collection and stream audio from Spotify. But the iPod shaped Duet controller, over 7 years old, got some issues charging its battery. I am hoping to be able to fix it, but in the meanwhile I wanted a bit of a replacement, to control audio playback, without using for example, the “Squeezer” app on my android phone.
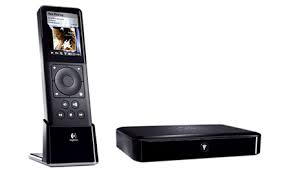
The Logitech Squeezbox Duet controller.
Before I bought the Squeezebox duet somewhere in 2009, I had been experimenting with a touchscreen based solution in combination Asus eeebox mini PC, but wasn’t really satisfied. Then came the Squeezebox duet along and I replaced the touchscreen setup for it. However, I kept the LG Flatron L1510SF 15-inch touchscreen. Now in 2016 one of the best community supported mini PCs must be the Raspberry Pi. I have also been playing with it to make both video and audio-player devices. There is also already a whole range of supported small touchscreens, which connect via the GPIO header or Display header, but using screens with HDMI, DVI, or VGA input and USB for the touch-control seems not so common. But when my Squeezebox Duet controller got issues charging, I was thinking why not pair my old 15-inch touchscreen with a Raspberry Pi running LMS?
Setting up Logitech Media Server (LMS)
Setting up a Raspberry Pi with LMS is very simple when you use the Max2Play audioplayer OS. Just download the SD image from the Max2play website, write it to the SD card with a tool like win32diskimager. Insert the SD in the Rpi, connect the Rpi to you network using an ethernet cable and power it up. You now can enter the setup of Max2play on you Rpi, by typing the URL: max2play/ in your browser. In the setup interface you can select to install LMS and the Squeezerplayer playback software onto you Raspberry Pi automatically. In this way you have a headless audio server device, which can playback songs locally or on other squeezebox devices on your network. You can control it via an app like Squeezer on android or by logging into the LMS server web-interface on your laptop or PC.
Jivelite, the touchscreen interface for LMS
The LG Flatron L1510SF USB controlled touchscreen.
In my case, I wanted to use a local touchscreen display to control Rpi with LMS. For this, you have to do some extra work. First of all, you need to connect the screen and also for setup purposes, a keyboard and mouse. Secondly you need to install the JiveLite Squeezebox interface software via the Max2play setup. This is a Max2Play premium feature which costs you a license fee of €9,99 per year. It is possible to setup LMS and Jivelite without Max2Play, but not as effortless as provided by the setup interface of Max2play. The JiveLite setup in Max2Play lets you also select several JiveLite interface skins, but these are tailored to the smaller Raspberry Pi specific touchscreens and needed some modification to get a fitting layout for the 1024×768 resolution of my LG touchscreen. But more about that later.
Calibrating your USB touchscreen
Now we first need to get the USB touchscreen working with the Raspberry pi. When researching how to do this, I came across this article (in Dutch). Which describes the process for the exact same screen as I am using. First of all, you need to install xinput-calibrator. You best do this locally on your Rpi using the attached mouse and keyboard by opening a terminal window and typing sudo apt-get install -y xinput-calibrator. You now have to run xinput-calibrator by typing xinput-calibrator. This will open a window for calibration. You can follow the instructions for calibration and use a stylus for best precision. This will result in an output window with calibration parameters that need to be put into the /etc/X11/xorg.conf.d/99-calibration.conf file. I did this with the parameters I recorded but run into problems. The LXDE gui would not show after a reboot. So in the end, I just used the exact same settings as described in the article with the exact same LG touch screen. That did the trick, the touchscreen is working fine.
Making the Joggler skin fit your resolution
Now I wanted the have a JiveLite skin that was a good fit with the resolution of the screen. The Joggler skin, came nearest to what I wanted but needed adjustment to fill the whole screen. For this you need to edit the code of skin file: /opt/jivelite/jivelite/share/jive/applets/JogglerSkin/JogglerSkinApplet.lua
And edit line 259 so it reads: Framework:setVideoMode(1024, 768, 0, false) where 1024 and 768 reflect the resolution and aspect-ratio of the screen.
When you want the spectrum visualizer of Jivelite to show correctly (Only visible when playing audio locally on the LMS machine). You also need to edit the following section in the JogglerSkinApplet.lua file. The values to edit are shown in bold
spectrum = {

position = LAYOUT_NONE,

x = 0,

y = 2 * TITLE_HEIGHT + 4,

w = 1024,

h = 566 - (2 * TITLE_HEIGHT + 4 + 45),

border = { 0, 0, 0, 0 },

padding = { 0, 0, 0, 0 },
After a restart of the Jivelite GUI, or reboot of the system, the layout should have a good fit with the resolution of the screen. Some buttons may still not have the most perfect scaling, but it is all functional. I however will, keep an eye open for a more perfected 1024×768 skin for JiveLite. If you a reading this and have one or knows one, please let me know.
Finally
One small thing is still bothering me and this is the visible mouse cursor. Max2Plays add-on, specific for the smaller Raspberry Pi touchscreens, has a very handy checkbox to make the mouse pointer on a touchscreen invisible. But as my touchscreen is not supported by this add-on, I cannot use it. Any suggestions to make the mouse pointer disappear are also very welcome. To get a better impression of how it works and what it looks like I recommend you to watch my youtube video about it, here below.
I’m probably not the only one who has shelves full of CDs, folders with between 10 and 100 GB of MP3s and is now consuming his music mostly via streaming services like Spotify. The latter two clearly aimed to personal use initially, on a MP3 player, iPod or your smartphone and some headphones. So If you want to play music on you Hifi, you perhaps still revert to ordinary FM radio or a CD. In the meanwhile all kinds of solutions for playing MP3 on your HiFi have been developed. Tuners/Amplifiers with USB or network input and WiFi connections that support DLNA, so that MP3s in a folder on your computer or network storage can be played.
Logitech Squeezbox Duet.
I myself purchased the Logitech Squeezebox Duet, for this purpose, back in 2009. This solution consists of two devices. The receiver box to connect to your HiFi set and the controller, a remote with an iPod-like jog button to go through the different menus. The two devices talk to each other using Wifi (or wired network connection in the case of the receiver) and a PC with your MP3 collection, running a special server-software. This set-up was at the start not a very easy configurable and stable solution.
However if you also want to use streaming services on your Hifi, you need to make another step. (In the case of the Squeezebox this was a small one, but I will perhaps cover this in another post.) You can of course connect your smartphone directly to your Hifi, but that is not very practical. You can invest again in new streaming ready devices. There are a lot of wifi and streaming enabled speakers available these days, with SONOS as maybe the best known but certainly not the cheapest example. However a lot of tweakers have come up with cheap and workable DIY alternatives.
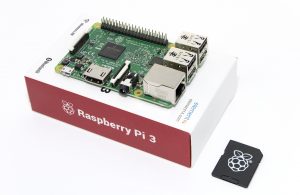
Raspberry Pi revision 3.
Especially the arrival of the Raspberry Pi seems to have been a catalyst for all kinds of solutions to stream your audio in a simple way to your Hifi. For those who do not know: The Raspberry Pi is a relatively inexpensive mini-computer (~ € 35 without a housing) of credit card size. We now arrived at version 3 of this computer, that has a micro-SD card slot for the software and also an HDMI output, audio/video jack, 1 micro usb for power and further a LAN port, 4 full size USB ports, WiFi and Bluetooth. Furthermore, the Raspberry Pi has the so-called “general purpose input / output pins” or simply GPIO pins. These pins can be used to control all kinds of stuff. In the case of Hifi there are beautiful solutions such as high-quality digital to analogue audio converters boards, that give superior sound quality compared to the standard audio chip of the Raspberry. Examples of this are the Hifiberry range and Pomorino’s Phat DAC.
Nice pieces of hardware you might think, but what about the software? The Raspberry Pi has a fantastic community of tweakers who develop both hardware and software, mostly as open source, freeware. When it comes to so-called “standalone” or “headless” audio players, there is choice. There is Max2play, who also offers multi-room speakers support and three other packages, which have a shared history: Moode audio, Rune audio and Volumio. Max2play, Mood and Rune audio are all focused on just the Raspberry Pi and similar minicomputers, Volumio however, has two bonuses: Support for Intel computers, or in other words: Any old PC or Laptop may have lying around, and a Spotify plugin .
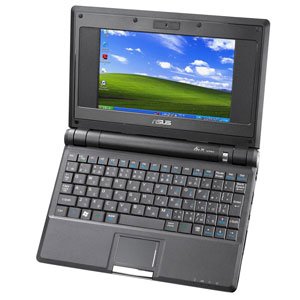
The Asus eeePC 4G.
In my case I still had an early netbook lying around and I was wondering if Volumio would run or not, on such a underwhelming machine. I am talking about an ASUS EeePC 4G, see here for its specification. The existing 500 mb of RAM, I replaced for 1Gb. The internal storage of 4GB is also tiny, but we do not need it, in this case, as we run Volumio from a SD card. It should be possible to install Volumio on the internal storage, but this is (still) a bit cumbersome.
In itself, the installation is fairly straightforward and clearly explained on the Volumio website. I also made a YouTube video where I run through the required steps, which you can watch below. First of all, you must download an SD disk image, the Intel (x86 / x64) version in this case, from the Volumio website. Then use a software tool like Win32imager or Rufus to write this image on an SD card of at least 4Gb and speed class 6. Generally it is advised to use a class 10 card, but I had only a class 6 SD around and it works well. Now it’s just a matter of booting from the SD card. This requires some modifications to the BIOS settings. After that, it takes some time for Volumio to get ready for its first use. After this lengthy initial start-up, reboots are going much quicker.
Volumio is primarily intended as a “headless” audio player, which means you control it via a web interface on your PC, laptop, tablet or smartphone. You can use this interface by entering the URL: /volumio.local or IP address of your Volumio machine in a webbrowser. The laptop has a screen so you can also control it using this. This is especially useful for the setup of you Wifi connection for the first time. I also noticed that the interface on the laptop itself was a lot slower than the webinterface on another PC or smartphone, which is striking. Via the (Web) interface, you can also configure other things such as the connection to your music folders and of course installing and setting up the Spotify plugin. You’ll need a Spotify Premium account for that. As you will see in the video, Volumio is working properly on this underwhelming mini laptop. So if you’ll be using a newer model, there is no reason, for it to work as well.
The only minor thing I run into was, that for a true headless audio player, you would like to use it with the lid closed. You can then connect to your hifi and hide it. Unfortunately, many laptops go into a sleep mode if you close the lid and then the music stops. This is not convenient, but for this I have found a “hack” to solve this. Volumio is based on a Linux operating system and you can use the software tool PuTTY (Windows) to create a so-called SSH connection. You can than give commands to the Linux backend. In this way, you can disable all sleep and suspend modes and it will continu to play the music, when you close the lid. This is also shown in my Youtube video below. After logging in via SSH (Putty) using the IP Address of your Volumio machine with user: Volumio and password: Volumio. You should than enter the following command:
Followed by pressing <Enter>. This will disable all sleep modes in your settings. In this case it is important to always keep your laptop plugged in, the battery will otherwise run out of juice a can damage your SD card.