Controlling your C64 not with a mouse, but with a R.A.T

A part of my retro-computer collection consists of several Commodore-64s. The C64 was the computer that I wanted as a 12-year-old but did not get… I am only discovering it now. One of the machines I have was a great secondhand deal.

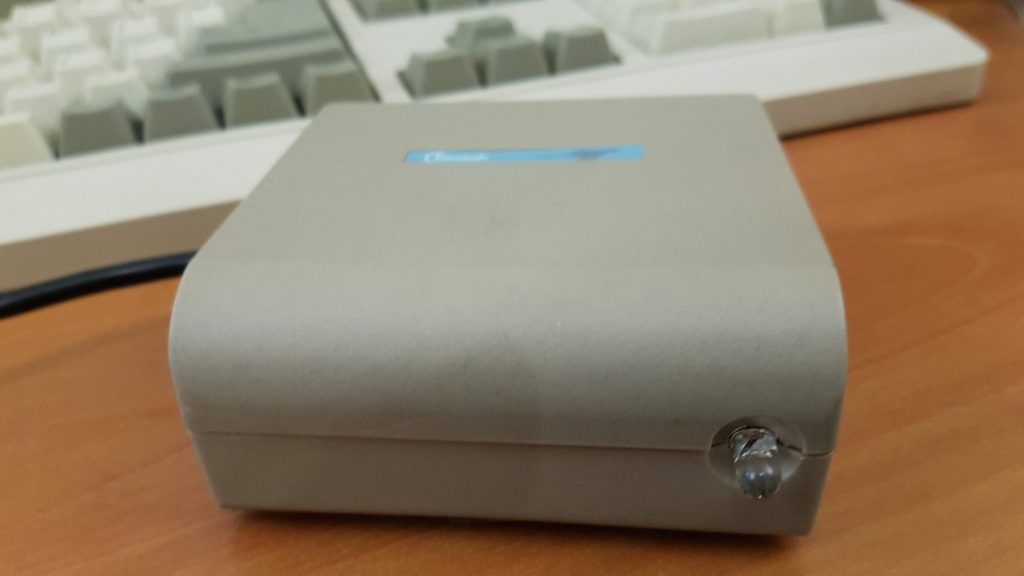
It’s a C64 complete with a datasette player, floppy drive everything had still its original box. I also came with an extra box, with random computer stuff. Besides a collection of cassette tapes with software and a collection of EPROMs, the previous own programmed custom kernals, this box also held a strange peripheral that I had not seen before. A beige box with a black cable having an 9 pin joystick connect attached and one clear led, or at closer inspection an IR receiver. The box had only a label on the top reading “Cheetah”. On the bottom were 3 rubber feet, but no label with a model number of sorts. At first instance, I even doubted if this was a genuine sold product or someone’s DIY project.

The beige box in Question

Because I thought it was a wireless, IR-controlled peripheral, I started Googling with catchwords such as “infrared” “joystick” “c64” “cheetah” with images, but I didn’t see the box that I had before me. But via the name Cheetah, actually Cheetah Marketing, a British manufacturer of peripheral devices, mostly joysticks for the 8-bit computer generation and also sound and music-related peripherals, I came across the Remote Action Transmitter (R.A.T.). The different articles only referred to the version for the ZX spectrum and mostly to dated photos of what that thing had looked like. But in the end, I also found an episode (#34) of Paul Jenkison’s “Spectrum Show” on Youtube where this device is revealed. It consists of an IR receiver in the form of a plug-in module for the ZX spectrum (which did not have a joystick port) and instead of a joystick, a remote control with a joypad and fire button designed as membrane buttons. So I went digging in the box to see if I could find a remote control and yes it was.

The controller as shown in episode 34 of Paul Jenkinson’s Youtube channel “The Spectrum Show”

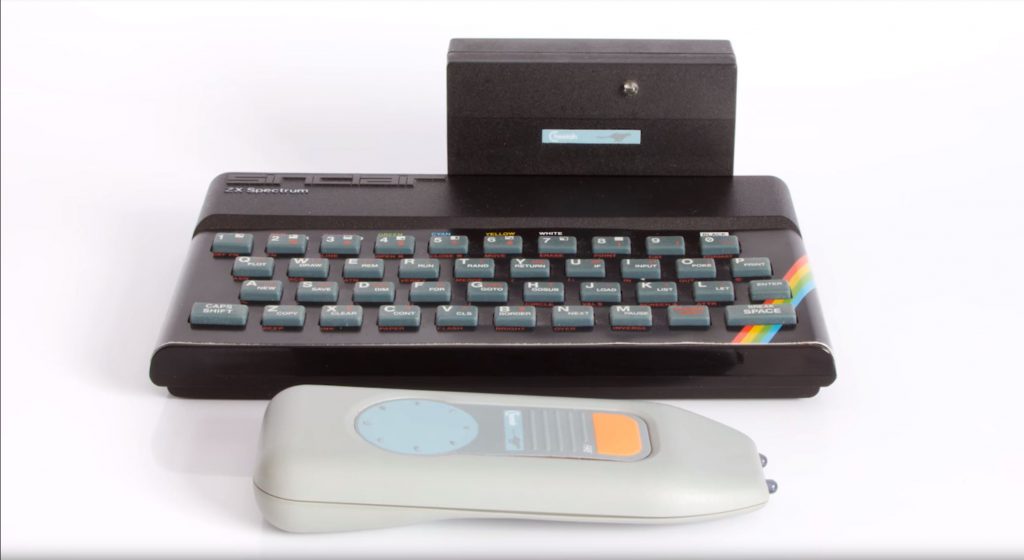
This remote control is identical to the one shown in the “Spectrum Show” episode. The remote control gets its energy from a 9V block battery and has two IR transmitters on the front. For operation, you need two hands because you operate the fire button with one thumb and use the other thumb for the joypad. The joypad is of course not analogous like a “real” joystick. There are eight specific positions that the joypad recognizes and transmits to the receiver. In my case, it is the receiver that makes it special, because it can probably be used on all machines with an 8 pin joystick port (Commodore, Atari), instead of the specific ZX spectrum plug-in module. Anyway, would I really like to use this thing? The idea of having a wireless game controller in 1984, it is way ahead of its time. Wireless controllers have only become commonplace with the fifth generation of consoles in 2005-2006. The implementation of the idea in 1984 is not good and actually more of a gimmick. The fact that you have to use the thing with both hands and aim properly and still are “treated” with poor response times, makes it more aggravating than something useful. The device can indeed be used from quite a distance but it also means squinting to see the little CRT of that era. No, in my view the R.A.T. more a nuisance, then a blessing. Probably, therefore there are very few left, and that makes it a rare item.

A drawing of the initial design of the R.A.T., rather as a joystick, in Cheetah patent application GB2158667

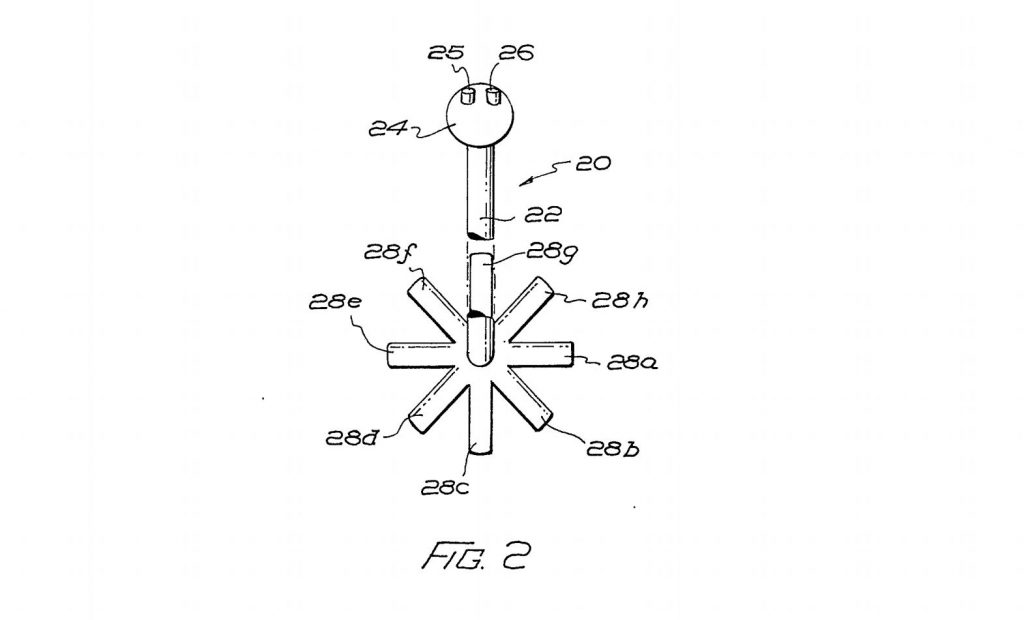
On one of the advertisements for the R.A.T., I saw “Patent Pending”. This aroused my interest because I know my way around the various patent databases. Could I trace the patent on that device? Yes, the British patent no.2158667 filed by Cheetah Markting on May 3, 1984 and granted on January 20, 1988, describes the wireless game controller. However, the configuration in the drawings differs from the device that appeared on the market. The controller started more as a joystick than a joypad. A joystick with two fire buttons on the handle which would make moving and firing with one hand possible. However, I see that this design would have led to problems. As said earlier, the infrared transmitter can only encode eight specific positions and send them to the receiver. To overcome this for a joystick, which can in principle take up an infinite number of sub-positions, the thought of something. The patent shows a joystick, that cannot move around freely, but an opening in the form of an eight-pointed star in the foot guides the user of the joystick to one of the 8 positions when moving the stick from the centre, from one position to the other is therefore only possible by returning to go through the centre. This looks like an innocent idea, but every joystick user knows what the scenario will be if you start to play. In the “heat of the moment” you will use force and break the stick or the foot. I wonder if Cheetahs engineers realized this, redesigned it as a joypad or that real joystick prototypes were made that broke after a short torture during testing. One can only wonder.

Ready to (re)start

Yikes, it took some time, before I had time to pick up on my Blog and Vlog again. But after a break of almost 2 years, we’re almost there! I will shift my topic more towards the Retro-Tech side instead of the Multi-room speaker (Volumio/Max2Play) centred subjects, that I made earlier.

In the meanwhile, I build quite the collection of Retro (computer) stuff. I also now have a nicely equipped electronics lab to be able to do some serious soldering. I have also so some ideas for mini tech documentaries with a focus on the history of computer in the Low countries. For this restart, I have also a new intro that you can watch as a teaser of what’s coming.

New trailer – New content!

I’ll be back

When I started my Youtube channel last year around this time, I was in between jobs and had quite some time on my hands to release some video’s. Inspired by the likes of Techmoan, 8-bit guy and others I started to post some video’s on tech stuff I was working on at the time. It took some courage to get in front of the camera and put it out there. But I was quite pleased with result especially when I found that a lucky item on the combination of Volumio and Spotify Connect clearly struck a cord.

It was merely spreading the word of a solution which was discussed in a niche forum, to the wider public of people using Youtube as an information resource. A nice amount of views and hartwarming comments were the result, Thanx for that everybody. This is of course something I liked to continue, but then there was this new job, Damn!

No, that really is a positive thing of course. But time became more scarces especially due to my 3 hour commute every working day, resulting just one posted video in September. But my channel has been on my mind, writing down topics, reading up and getting my hands on voice assistants and AI on the Raspberry pi,  FPV quadrocopter things, vintage electronics like some nice Sony walkmans and Commodore Amigas. In the meanwhile I found a home closer to my new job and will be moving there beginning next year. At my new house I will have space that I can dedicate as an electronics “lab” and studio, so I am planning a “relaunch” in the spring next year. So thanks for your support so far and bear with me. As T-800 Arnie would say: I’ll be back!

I’ll be back

Streaming audio to your Hifi? Just use an old laptop.

I’m probably not the only one who has shelves full of CDs, folders with between 10 and 100 GB of MP3s and is now consuming his music mostly via streaming services like Spotify. The latter two clearly aimed to personal use initially, on a MP3 player, iPod or your smartphone and some headphones. So If you want to play music on you Hifi, you perhaps still revert to ordinary FM radio or a CD. In the meanwhile all kinds of solutions for playing MP3 on your HiFi have been developed. Tuners/Amplifiers with USB or network input and WiFi connections that support DLNA, so that MP3s in a folder on your computer or network storage can be played.

logitech_duet

Logitech Squeezbox Duet.

I myself purchased the Logitech Squeezebox Duet, for this purpose, back in 2009. This solution consists of two devices. The receiver box to connect to your HiFi set and the controller, a remote with an iPod-like jog button to go through the different menus. The two devices talk to each other using Wifi (or wired network connection in the case of the receiver) and a PC with your MP3 collection, running a special server-software. This set-up was at the start not a very easy configurable and stable solution.

However if you also want to use streaming services on your Hifi, you need to make another step. (In the case of the Squeezebox this was a small one, but I will perhaps cover this in another post.) You can of course connect your smartphone directly to your Hifi, but that is not very practical. You can invest again in new streaming ready devices. There are a lot of wifi and streaming enabled speakers available these days, with SONOS as maybe the best known but certainly not the cheapest example. However a lot of tweakers have come up with cheap and workable DIY alternatives.

raspberry_pi_3

Raspberry Pi revision 3.

Especially the arrival of the Raspberry Pi seems to have been a catalyst for all kinds of solutions to stream your audio in a simple way to your Hifi. For those who do not know: The Raspberry Pi is a relatively inexpensive mini-computer (~ € 35 without a housing) of credit card size. We now arrived at version 3 of this computer, that has a micro-SD card slot for the software and also an HDMI output, audio/video jack, 1 micro usb for power and further a LAN port, 4 full size USB ports, WiFi and Bluetooth. Furthermore, the Raspberry Pi has the so-called “general purpose input / output pins” or simply GPIO pins. These pins can be used to control all kinds of stuff. In the case of Hifi there are beautiful solutions such as high-quality digital to analogue audio converters boards, that give superior sound quality compared to the standard audio chip of the Raspberry. Examples of this are the Hifiberry range and Pomorino’s Phat DAC.

Nice pieces of hardware you might think, but what about the software? The Raspberry Pi has a fantastic community of tweakers who develop both hardware and software, mostly as open source, freeware. When it comes to so-called “standalone” or “headless” audio players, there is choice. There is Max2play, who also offers multi-room speakers support and three other packages, which have a shared history: Moode audio, Rune audio and Volumio. Max2play, Mood and Rune audio are all focused on just the Raspberry Pi and similar minicomputers, Volumio however, has two bonuses: Support for Intel computers, or in other words: Any old PC or Laptop may have lying around, and a Spotify plugin .

eeepc4g

The Asus eeePC 4G.

In my case I still had an early netbook lying around and I was wondering if Volumio would run or not, on such a underwhelming machine. I am talking about an ASUS EeePC 4G, see here for its specification. The existing 500 mb of RAM, I replaced for 1Gb. The internal storage of 4GB is also tiny, but we do not need it, in this case, as we run Volumio from a SD card. It should be possible to install Volumio on the internal storage, but this is (still) a bit cumbersome.

In itself, the installation is fairly straightforward and clearly explained on the Volumio website. I also made a YouTube video where I run through the required steps, which you can watch below.  First of all, you must download an SD disk image, the Intel (x86 / x64) version in this case, from the Volumio website. Then use a software tool like Win32imager or Rufus to write this image on an SD card of at least 4Gb and speed class 6. Generally it is advised to use a class 10 card, but I had only a class 6 SD around and it works well. Now it’s just a matter of booting from the SD card. This requires some modifications to the BIOS settings. After that, it takes some time for Volumio to get ready for its first use. After this lengthy initial start-up, reboots are going much quicker.

Volumio is primarily intended as a “headless” audio player, which means you control it via a web interface on your PC, laptop, tablet or smartphone. You can use this interface by entering the URL: /volumio.local or IP address of your Volumio machine in a webbrowser. The laptop has a screen so you can also control it using this. This is especially useful for the setup of you Wifi connection for the first time. I also noticed that the interface on the laptop itself was a lot slower than the webinterface on another PC or smartphone, which is striking. Via the (Web) interface, you can also configure other things such as the connection to your music folders and of course installing and setting up the Spotify plugin. You’ll need a Spotify Premium account for that. As you will see in the video, Volumio is working properly on this underwhelming mini laptop. So if you’ll be using a newer model,  there is no reason, for it to work as well.

The only minor thing I run into was, that for a true headless audio player, you would like to use it with the lid closed. You can then connect to your hifi and hide it. Unfortunately, many laptops go into a sleep mode if you close the lid and then the music stops. This is not convenient, but for this I have found a “hack” to solve this. Volumio is based on a Linux operating system and you can use the software tool PuTTY (Windows) to create a so-called SSH connection. You can than give commands to the Linux backend. In this way, you can disable all sleep and suspend modes and it will continu to play the music, when you close the lid. This is also shown in my Youtube video below. After logging in via SSH (Putty) using the IP Address of your Volumio machine with user: Volumio and password: Volumio. You should than enter the following command:

systemctl mask sleep.target suspend.target hibernate.target hybrid-sleep.target

Followed by pressing <Enter>. This will disable all sleep modes in your settings. In this case it is important to always keep your laptop plugged in, the battery will otherwise run out of juice a can damage your SD card.

Success!

Welcome!

Hi there, welcome to the Meganton Tech Channel Blog. This blog accompanies my YouTube channel, with more detailed and background information on the topic in my video’s and other topics that don’t lend themselves to put into a video. These topics will range from showing off old electronics, new gadgets, DIY topics on computers and electronics, such as tinkering with Raspberry Pies, but also radio-controlled stuff like quadrocopters/drones and even some photography and video stuff. So everything I like to do, that has to do with tinkering and tweaking electronics. I hope you like it too!

Disclaimer: I am NOT a electronics or computer professional just a self-taught hobbyist, so all topics but especially the DIY topics documented here are only to show you how did things. These may not be best practises and if you used them, you do them without guarantee on your own risk.